Comfort and Speed in Arpeggios

I thought I would take a moment to stress how important it is to know how to apply the principles from the last post to identify and problem solve mechanical weaknesses in repertoire you are working on. Because I am working on a lot of music by Agustín Barrios Mangoré (1885-1944), I thought I would use two examples of passages you all may be familiar with. I have played the music of the great Paraguayan virtuoso for decades and I still find it fun to work on. I especially enjoy his works with perpetual motion activity. Barrios’ Estudio de concierto, Las abejas, La catedral’s allegro, Danza paraguaya, and passages from his famous waltzes are perfect pieces to spend hours on. So, for this post, we’ll focus on using rhythms to strengthen our understanding and facility of the patterns in these pieces.

Estudio de Concierto

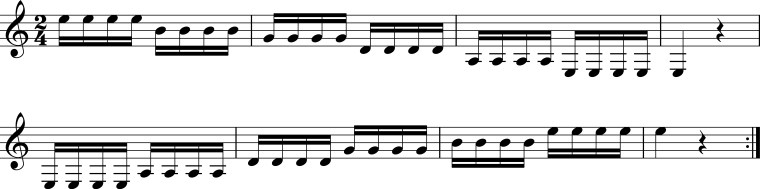
The following example illustrates 5 rhythms in which to work the arpeggio pattern for Barrios’ Estudio de Concierto. Begin by choosing the right hand fingering that most suits your technique. Whether you know the piece or not, practicing each measure in these rhythms will help develop the comfort of playing the arpeggio faster than if you were to only play in a straight rhythm, though it is necessary to do this as well (!).

Arpeggio Fingering                                Rhythm 1                                  Rhythm 2right hand barrios rhythms.jpg

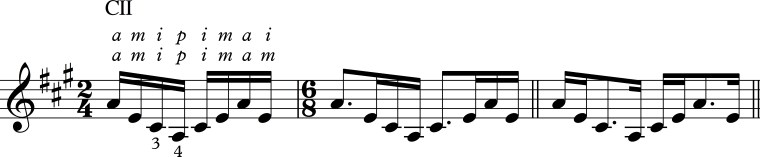
Rhythm 3                                                   Rhythm 4                                  Rhythm 5

right hand barrios rhythms 2.jpg

Vals Op. 8, Nº4

Here is the campanella passage from one of my favorite pieces. This passage deserves more writing but for now I will limit myself to rhythms.

right hand barrios rhythms 3 vals.jpg

Because I know this piece well, I use rhythms to warm up and will often play through the entire section of the piece in as many as 16 rhythms. Here are four that I like to start with:

Rhythm 1                                     Rhythm 2                      Rhythm 3                     Rhythm 4right hand barrios rhythms 4 vals.jpg

Do not feel obligated to go through the entire passage. Instead, spend some time repeating certain groupings in an attempt to make them feel natural and ultimately easy. You may find that you are better at some and that certain patterns remain sticky. Work on the sticky ones.

right hand barrios rhythms 5 vals.jpg

And, if you are not exhausted by this point, here are some additional groupings (notated in shorthand) rotating two eighth notes (represented by a space) through sixteenth notes:

pi  am  pi, pia  mp  i, pi  ampi , p  iamp  i, pi  a  mpi

Or rotating a triplet of sixteenths with 3 eighth notes:

p  i  a  mpi, p  i  ampi  , p  iamp  i  , piam  p  i

Or Using only one dotted eighth note (two spaces):

p   iampi, pia   mpi, piampi   , pi   ampi

I hope this helps. If there are any technical questions you are thinking about in your practice please leave a comment. I’m thinking about a post answering some common questions that I keep getting. And, in the future, I’m going to try to include a video to supplement the posts when I have the time. Until then!


Developing Arpeggio Speed

There are some basic principles that I think most guitar students should know to develop speed and flexibility when practicing right hand arpeggio patterns. These principles are applicable to other areas of technical development, so once you become familiar with them, you can try to apply them to your scales and to difficult passages in your repertoire.

Assuming you have a decent base, a clear stroke, and you’ve logged sufficient hours of basic arpeggio practice, the next step is to explore them to uncover weaknesses and discover your own limitations and strengths.

For all of the following ideas, spend time on each one as if were the only one to master, stick with them for longer than you may have the patience for because careful and consistent repetition really helps. I’ll illustrate the principles using pima across strings 4, 3, 2, and 1. This is a default position for your right hand that should used ALL the time in arpeggio practice and through ridiculous amounts of practice, it should start to feel like home. Once pima is mastered try the other combinations of four fingers across four strings: piam, pmia, pmai, paim, pami.

Accents

Simply play through each trying to accent the note indicated. You can exaggerate the follow-through of the stroke to achieve this or turn the exercise on its head by playing all unaccented notes in a more relaxed fashion.

right hand pima accents.jpg

Downbeat Rotation

Though related to accents, I swear that when I start this arpeggio on m it feels out of balance. I guess I’ll go work on that right now.

right hand pima rotate downbeat.jpg

Active Preparation

I like to think that if my finger is on the string it will pluck that there is no way José that I will miss that note. So, guess what I try to do all the time? I try to simultaneously pluck and prepare the next pluck so that I’m theoretically always prepared and waiting on the string. Practice landing on the x but do not pluck.

right hand pima prep focus.jpg

Meter

I love doing this. Take a 4-note arpeggio and play it through as a continuous triplet until the first plucked note (p) cycles back into the downbeat.

right hand pima asymmetrical 2.jpg

or try this one:

right hand pima asymmetrical.jpg

Bursts

Set the metronome to a tempo that is near your limit or beyond. Think of it like a mini-sprint. Exert hyper-control when you go slow so that the bursts remain as accurate as possible.

right hand pima bursts.jpg

Rhythm

Related to bursts but meant more to develop rhythmic flexibility, here are the basic six rhythms I use (there are MANY more) all the time when warming up.

right hand pima rhythms.jpg

Good luck!


Resting the Right Hand

Apoyando, the word used to describe rest-stroke in Spanish literally means to lend support to and whether it’s rest-stroke with the fingers or thumb, the strings should support inactive or transient fingers while others pluck out pretty passages. Between you and me, my right hand needs all the support it can get. So with that in mind, there are moments while playing where you should search for opportune moments to provide support for your right hand by resting the fingers on strings as you play. Resting right hand fingers during play imparts many technical and musical benefits:

  1. STABILITY – Fingers in motion gain stability as they are moving against a fixed object (i.e. try kicking a soccer ball with both feet in the air vs. kicking the soccer ball with a solidly planted foot).
  2. FINGER INDEPENDENCE – Though this takes more time to develop, it is fundamentally important to develop the skill of moving a finger without exerting influence on the movement of an adjacent (or distant) finger.
  3. REFERENCE POINT – Wouldn’t it be nice for the right hand fingers to know where they are in relation to the strings?
  4. REST – Fingers recently held in motion can release tension by waiting on a string.
  5. MUSICAL TOOL – A resting right hand finger can inadvertently or intentionally silence sympathetic resonance or a note bleeding into another note. We can harness this new found super power to control voice ringing more accurately to reflect the intentions and articulations of our interpretation or, heaven forbid, the indications of the composer while benefitting from the above points.

For example if you are playing a p i m arpeggio, could a find a string to rest on? Could you plant all fingers before executing the first note? Or in playing Villa-Lobos’ Etude Nº1, could a rest on string 1 until it is necessary for engagement and then re-plant a quarter note or half-note later? When strumming with or m, could p rest on a lower string? Think of the analogous situation to the left hand principle of connecting two pinches. While playing an arpeggio can we both play and plant the next finger to insure that our right hand is not floating? Is an arpeggio an opportunity to plant all the fingers before execution or to sequentially plant as the fingers play?

Be on the lookout for right hand’s absolute lack of contact with the strings while playing and you will likely find many opportunities for improving your right hand’s technique.


More Scales to Master – Modes Part 1

In the last post related to scale development, I provided closed (or moveable) scale forms for major, harmonic minor, and melodic minor scales. In this post I’ll do the same except with modes. Though my understanding of modes is at best primitive, studying them to develop a better aural sense of what is happening both harmonically and melodically in the music we play, especially when the music has popular or folkloric roots (flamenco!), augments our musical knowledge. If you’ve been practicing only major and minor scales for years on end, your ear will welcome these forms to your practice. And, for those looking to gain a deeper understanding, there are bazillion jazz, improvisation, and composition sites to explore out there. But for the basics on modes go to wikipedia.

I’ve left out Ionian and Aeolian as their intervals correspond to major and natural minor.

C Dorian Scale 3rd string dorian diaScale 4th string dorian diaScale 5th string dorian dia.jpg

C PhrygianScale 3rd string phrygian diaScale 4th string phrygian diaScale 5th string phrygian dia

C LydianScale 3rd string lydian diaScale 4th string lydian diaScale 5th string lydian dia


Stay tuned for the remaining modes (mixolydian and locrian) and some other scale goodies…

Finger Contraction Equals Tension

Yesterday I was working on Julio Sagreras’ super fun El Colibri (The Hummingbird) with my son which made it twice the super fun. He’s at the point where he can play through the entire piece, correct fingerings in both hands, smoothly. His lofty goal is 180bpm. Yikes! I explained to him that lofty goals are the best because he may get closer than if setting a lesser goal. And, who knows, maybe he will be the first : ).

In an effort to support this enthusiasm, we went through the piece again in an effort to discover ways to help him make both hands more efficient and relaxed. The one principle which really translated into faster and better looking hands almost immediately was shifting without finger contraction (or extension) and maintaining a relaxed left hand position.

If you are trying to squeeze every last drop of tension out of your hands in order to speed things up, do not contract the left hand fingers into each other (and, of course, do not extend the fingers away from each other).

The temptation to contract to prepare finger 4 is overwhelming but it is not the finger to focus on. Instead focus on using finger 1 to shift and as a result yank finger 4 into place. This reduces our mind’s focus to one movement: the shift. Otherwise, we focus our attention on placing finger 4 and then shifting. I don’t know about you all, but I’d rather have less to think of when playing quickly. It makes the piece feel slower.

And, now, for my first instructional video:

And, if you want to see the absolute finest and scariest rendition of this, check out the great Cuban guitarist Marco Tamayo:


By the way, he has a hyper-detailed edition of El colibri available from his website. Wait, is that 180bpm?

The Best of YouTube

YouTube is both a blessing and a curse. Among thousands of videos not worth watching, there are a few gems waiting for discovery. I’m hoping to add video tutorials on the elementary pieces that my students enjoy playing after they’ve finished the KinderGuitar curriculum. In the meantime, I’ll share some great videos I’ve discovered after being trapped in the YouTube world a few weeks ago. If you are still developing your technique, watch them over and over. If you are far along, there are still wonderful moments of insight to extract. I watched most of them in one sitting at 1.5x speed, taking notes, and sipping coffee. These videos come from Russian guitarist Andrey Parfinovich. He’s done the guitar world a great service when he decided to film his lessons with the masters!

Pepe Romero on left hand technique:

Pepe Romero on rest stroke technique:

Pepe Romero on tremolo:

Pepe Romero on rasgueado:


More soon….


Three Basic Scale Forms to Master

I just returned from a vacation that went by way too fast. As always, I was over ambitious when it came to planning out which pieces to learn but I did manage to re-work most of the Chaconne and will have many posts exploring what I’ve come across this time around.

In the meantime, the next post to help you develop a scale practice is here. Here are three moveable scale forms (major, harmonic minor, and melodic minor) covering three octaves starting on three different strings.

In general, focus on developing the skills you have worked on from the previous preparatory post in the more musical and sophisticated setting of scales: rest stroke, free stroke, string crossing, and very accurate transitioning from finger to finger. Use a metronome to track your progress and don’t be afraid to live in slow tempo world if it means you are becoming better and more consistent with your sound from note to note.

Rest-stroke fingerings: im, mi, ma, am, ia, ai, p, ami, ima, imam, amim, aimi

Free-stroke fingerings: im, mi, ma, am, ia, ai, pi, pm, pa, ami, ima, imam, amim, aimi, pmi, pami.

C Major Scale 3rd string major dia.jpgScale 4th string major dia.jpgScale 5th string major dia.jpg


C Harmonic MinorScale 3rd string har minor dia.jpgScale 4th string har minor dia.jpgScale 5th string har minor dia.jpg


C Melodic MinorScale 3rd string mel minor dia.jpgScale 4th string mel minor dia.jpgScale 5th string mel minor dia.jpg


Stay tuned (!) for the 3rd installment related to developing your scale practice where I’ll go through other scale forms.


Preparatory Work for Scales

During the summer months when it seems like there are extra hours in the day, I like to augment my practice by spending a lot more time with some intensive technique exploration and then learning new repertoire where I can experience the fruits of my labor. I remember coming across a sentence in Philip Hii’s writings essentially claiming that break-throughs rarely occur in the first few hours of practice. I agree wholeheartedly! And, as many of you could probably attest after practicing between the hours of 11 PM to 4 AM when the world is silent, break-throughs are not so often sought as just magically appear. So in this spirit, set aside a chunk of hours, grab some tea or coffee, and explore the next sequence of preparatory movements for scales.

Focus on the following key points:

1) Practice perfect alternation – As the finger performing the stroke moves towards its resting point, the next finger should release from its resting point to prepare the next stroke.

2) Keep everything relaxed – The only energy used is in the stroke, once this is performed the finger should release all energy and tension. In the best case scenario, the tension of the finger is released as the alternating finger exerts energy on the next stroke.

3) If you are still developing a technical base, spend more time on the basics – im, ma, ia and finger alternation with p are the more important fingerings to develop as all the others contain these basic movements.

Spend as much time within each step or rhythm to achieve improved tone consistency, stroke efficiency, rhythmic precision, and perhaps, speed. Use the 3rd string as a starting point before exploring other strings. If your nails wear easily, protect them with packing tape or keep most of your practice relegated to the first three strings. And, don’t forget to use your friend the metronome!

Rest Stroke or Apoyando

Step 1

Develop rest-stroke fingerings: im, mi, ma, am, ia, ai, p, ami, ima, imam, amim, aimi.

Scale 3 rh scale prep 1a small.jpg

Step 2

Develop string-crossing: im, mi, ma, am, ia, ai.

a)Scale 3 rh scale prep 1a1small.jpg

b)Scale 3 rh scale prep 1a2small.jpg

Step 3

Apply fingerings to simple coordination movements.

Scale 3 rh scale prep 3 small.jpg

Free Stroke or Tirando

Step 1

Develop free-stroke fingerings: im, mi, ma, am, ia, ai, pi, pm, pa, ami, ima, imam, amim, aimi, pmi, pami.

Scale 3 rh scale prep 1a small.jpg

Step 2

Develop string crossing: im, mi, ma, am, ia, ai, pi, pm, pa.

a)Scale 3 rh scale prep 1a1small.jpg

b)Scale 3 rh scale prep 1a2small.jpg

Step 3

Apply fingerings to simple coordination movements.

Scale 3 rh scale prep 3 small.jpg

Bring It All Together

 With a good chunk of time spent on the sequences above, you may be excited to test out the well-oiled machinery of your hands on scale forms and your repertoire. If you are looking for scale forms, stay tuned, as I plan to explore this in the next few posts.

This is Classical Guitar and Aural Refocus

As I plan out the next stages/posts for the blog I thought I’d give a shout out to Canadian classical guitarist, Bradford Werner’s great site www.thisisclassicalguitar.com. He covers so much: from reviews to lessons to a great selection of videos. He published a recent article I wrote on a concept I’ve found to really help me break through practice plateaus. Check it out: Aural Refocus Article.


Right Hand Technical Workout Part 2

Here is the second installment of our right hand technique series. After a solid warmup of the larger muscle groups and gross motor skills in our right hand through chords and rasgueado (see Part 1), we’ll start building movements in the right hand from two finger movements up to four finger movements.

To start we’ll use movements involving the thumb with one other finger (pi, pm, pa) and movements involving the thumb with two other finger movements (pim, pmi, pma, pam, pia, pai). The primary goals with the following drills are to develop a strong sense of how the fingers fall across the strings which will reinforce our default right hand position and to develop a strong sense of independence from finger to finger (i.e. the movement of one finger or stroke should not displace the hand from this default position).

Step 1 – Thumb with one finger movements (pi, pm, pa)

The fingers of the right hand not involved in the movement should passively rest by very lightly touching their respective string. If this is too difficult at first, have them float as close as possible above their respective string (p=4, i=3, m=2, a=1).

right hand pi 2.jpg

right hand pm 2.jpg

right hand pa 2.jpg

Step 2 – Proceed to alternation

right hand pi 2.jpg

right hand pm 1.jpg

right hand pa 1.jpg

Step 3 – Proceed to work on the following thumb with two finger movements (pim, pmi, pma, pam, pia, pai). Note that each line contains six different movements to develop.

right hand pim 1.jpg

right hand pma 1.jpg

right hand pia 1.jpg

That should keep you all busy! Stay tuned to Part 3.