Mini Masterclass – Natalia

Brought to public light by the great maestro Alirio Diaz decades ago, Venezuelan composer Antonio Lauro’s beloved Natalia (aka Valse Criollo and Valse Venezolano Nº3) has become one of the most widely played pieces on our instrument.

There are so many thoughts to share on this piece with students that I thought I’d do a short (which is now looking long) post about a passage in the first part of the piece that most students wrestle with as they begin to enjoy their discovery of Venezuelan guitar music.

To begin, the initial published edition by Broekmans & Van Poppel B.V. and the more recent edition published by Ediciones Caroní differ in several ways. It is important to note that both were revised by Alirio Diaz who over the decades has probably played this piece thousands of times. And, over the course of Alirio’s history with the piece, he has undoubtably made changes simply to keep the piece evolving in a creative way. Is the latest version better? Not necessarily. However, students should become intimately familiar with both and with alternate fingerings that may help them achieve their own musical goals.

It is important to mention that scores are often a very close approximation of the intent of the composer. In guitar scores, because of the fact that composers are cramming everything onto one staff, short hand helps musicians see through the clutter of notating all voices accurately. So with that caveat…

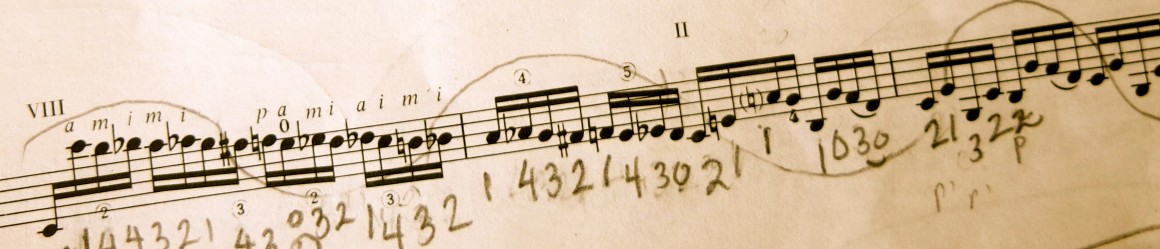
Here is the passage we’re studying from the first two editions for comparison:

Broekmans & Van Poppel B.V.

Natalia 1.jpg

Ediciones Caroní

Natalia 2.jpg

The differences are interesting to say the least. The fingering has evolved which, of course, is a natural thing to occur after years of playing the same piece. But, of note, notice the rhythmic changes with the beaming. Antonio Lauro’s music is always full of the dueling time signatures 3/4 and 6/8 which makes his and other Venezuelan music so alluring on a rhythmic front. There is a very different feel when playing the first measure of this passage.

When I initially learned Natalia decades ago, like most students, I used what was available. For the most part, I followed Alirio’s fingerings closely. However, as my hands have come into their own over the years, my version has evolved quite a bit to suit my strengths, technique, fingers, and musical ideas. Here are two ways I tend to play it these days:

Natalia 2 (Leo).jpg

Natalia 2a (Leo).jpg

The differences have evolved to help me feel more secure as I play the piece. Notice the guide fingers throughout.

As students uncover their own interpretations, I often make sure that they are aurally aware of as much as possible so that if they wanted to draw attention to a particular voice for any reason, they could do so. As much as I like the groovy and energetic way Alirio plays the piece, I often like hearing a more legato version so I try to keep my ear on the following voice:

Natalia 2a (Leo) melody.jpg

Despite the fact that they are written as eighth notes, I often try to connect the line. Did Lauro intend to break the line? Not sure. Can I play it both ways? Yes. Which do I like best? Depends on how I feel.

Another voice I like to draw attention to is this one:

Natalia 2a (Leo) inner voice.jpg

This was intended to be a MINI masterclass so I’m going to wrap this up. The bottom line is that pieces evolve in the musician’s hand. Spend time exploring the history of the pieces you are playing, and specifically with Natalia, the possibilities, fingerings, and seeing which rhythmic version feels right, and you will be on your way to crafting a meaningful interpretation that you can stand behind when sharing it with others.

A Look at Guide Fingers

The great Cuban guitarist Marco Tamayo reminded me that all shifts should occur with guide fingers lightly gliding on the strings, preferably the treble strings to avoid unnecessary noise. If you observe any great guitarist’s left hand, like Marco’s, you will witness a great left hand choreography – smooth, soft, efficient, relaxed. One of the key elements in building an effective left hand choreography is a thorough understanding of how to use guide fingers to bridge and connect movements that may seem unrelated. Think of guide fingers as fingers that remain in passive contact with the string while shifting.

See if you can find guides in the next passage.

Excerpt from J. S. Bach’s Double from BWV997

Bach BWV997 Guides 1

Did you find them all?

Bach BWV997 Guides 2

Try to locate all and label all the guides in your repertoire. You’ll find that it not only improves left hand fluidity but it also deepens your physical understanding of the piece you are working on and in turn can help your memory.

Stay tuned for ghost guide fingers and changing guide fingers…


Right Hand Alone

At a certain point, every aspiring guitarist tackling difficult repertoire discovers the value of practicing the right hand of a musical passage, phrase, or entire piece entirely by itself. Understanding exactly what the right hand is doing in terms of musical inflection, rhythm, and string crossing is an absolute must for mastering challenging repertoire.

The most compelling argument is that most guitarists tend to fret over the left hand and often let the right hand only play up to the left hand’s standard. Essentially, the process dumbs down the right hand, which under little practice could probably out-execute the left hand. So instead of dumbing down the right hand, enable the right hand to exceed itself by practicing its part alone and eventually the left hand will rise to the occasion of matching the right hand’s ability.

Another argument for practicing the right hand alone is that by writing out the passage as open strings, we can better see  where the string crossing happens and as a result can insure that the right hand remains efficient (crossing to higher strings with m instead of i, for example) and if there is an inefficiency, that it is a conscious decision to have it that way.

Practice writing out several difficult passages of your repertoire as open strings, investigate whether or not the right hand fingering decisions make sense to optimize string crossing, and then practice the right hand alone on open strings striving to make it musical, rhythmic, and automatic. Then, invite the left hand back into the game to assess the difference.

At some point, after having practiced enough material in this fashion, you’ll find yourself able to visualize the best choice for the right hand without writing it out and you’ll even be able to play the right hand alone by looking at your score.

Here is an example of a passage and what it looks like after writing it out on open strings. Notice the rhythm is different to account for slurs. Also, notice all of the string crossing situations are efficient except for one situation which I’ve left for consistency in the right hand.

Excerpt from J. S. Bach’s Prelude in E Major, BWV 1006a

Bach Right Hand Example 1

Passage in open strings (string crossing in boxes):

Bach Right Hand Example 2.jpg


Cross-Stringed Ornaments 1

When I was just starting to broaden my ears to the brilliance of Domenico Scarlatti’s Sonatas, I heard one of my early teachers, Robert Squires, play through Scarlatti’s Sonata in A Minor, K.54 (L.241). He played all of the trills cross-stringed and his reasoning was that a harpsichord would also perform the ornaments cross-stringed. Whatever the reason, it sounded so wonderful to hear the crispness and clarity of the trills played this way. Since then, I have worked on a lot of sonatas and have found that regularly practicing the following right hand formulas really help to develop and maintain this skill. There is a lot of beauty in playing trills with slurs but in a lot of baroque keyboard music, performing trills and ornaments across strings is worth the work.

right hand ornaments

Villa-Lobos Etude Nº1 Part 1

I love getting to the point when a student is ready to tackle Heitor Villa-Lobos’ Etude Nº1. There are so many angles to explore and it takes a lot of dedication to master it. There was a time when I was preparing to perform all 12 etudes that I decided the best use of my warm up time was to spend at least 30 minutes on Etude Nº1, 30 minutes on Etude Nº2, and 30 minutes on Etude Nº3. After which my hands always seemed to work well as I worked on other material.

Over the course of months I may have played those etudes at least a thousand times in many, many different ways. I tried everything I could think of to make them better.

The first step in this great journey is to develop the right hand’s ability to play the entire arpeggio comfortably. The great Andrés Segovia suggested a solution that is still used by the majority of students and the one I used for years. However, as we develop our abilities we find that our hands have an easier time with certain movements and we find ways to use those movements to harness our strengths.

So, I always suggest putting in your time with Segovia’s solution until you can perform the Etude with that pattern. I find that the weakest part of the solution is moving from to a making the 3rd quarter note beat (half note of the measure) sound articulate which helps to delineate the rhythmic structure of the Etude, so I have come to prefer substituting with i. However, it wasn’t until working on the piece for many years that I slowly came to prefer it. Explore the possibilities in the practice room by adding in a few alternate fingerings to start the exploratory process. I’ve watched my mentor, Eliot Fisk, play it through in hundreds of ways just as an exercise to develop string crossing – I think I remember him even doing the whole arpeggio with m and pinky!

Here are some important ways to practice it. Stay tuned for Part 2 and we’ll go deeper.

right hand villa lobos fingering 1

One-Time
Monthly
Yearly

Make a one-time donation

Make a monthly donation

Make a yearly donation

Choose an amount

¤5.00
¤15.00
¤100.00
¤5.00
¤15.00
¤100.00
¤5.00
¤15.00
¤100.00

Or enter a custom amount


Your contribution is appreciated.

Your contribution is appreciated.

Your contribution is appreciated.

DonateDonate monthlyDonate yearly

Romanza

Romanza (Anonimo)

This is a beautiful piece and a very useful one for students wishing to work on vibrato, shifts, bars, and ami.

Practice Tips:

  • try to use a rest-stroke on to bring out the melodic line
  • do not accent the first note after any shift unless you mean to do so musically
  • do not cut off the last note before any shift
  • try inverting the pattern to aim for variety and fun
  • you can explore more right hand patterns using the form of the piece

Attention to Detail for Memory

While looking through old scores to inspire myself, I noticed what I always notice: notes to myself throughout the scores I’ve studied giving all sorts of instruction. Lift elbow slightly right before a reach with the third finger to the sixth string, place 1 on string 3 [with an arrow pointing to the space between two notes] indicating a soon to be guide finger,  place p on string 4 here [another arrow pointing to the space before a note to be plucked] indicating a necessary preparation, breathe here, let go early, and on and on.

Unless they are obvious, I write in every left hand and right hand fingering of a work that I am eventually intending to study in depth and ultimately perform. I also find that writing down notes and observations about details I notice whether related to the underlying music (harmony, form, etc.), to motions in the choreography of my hands (lifting, placing, shifting, etc.), or to the emotional associations and musical ideas I develop as I build a relationship with the music aids a great deal in building up a complete mental picture of the work in study.

The result of studying a piece of music this way often manifests itself in being able to play through the music well very early on without the need of the score. If I continue to work up the piece of music, perform it, and move on, I find that reworking the piece is very easy as the visual image is rich with details. Memory never seems to be an issue.


IMG_1674

Welcome to Six String Journal

With countless advancing students in my current teaching studio, I’m starting to feel the need to support them with posts that will inspire more repertoire exploration, more technique practice, and more tutorials to supplement their knowledge about the alluring world of the guitar.

So, expect mini-lessons, master classes, tutorials, technique work, repertoire solutions, music, videos, player spotlights, interviews, and more…