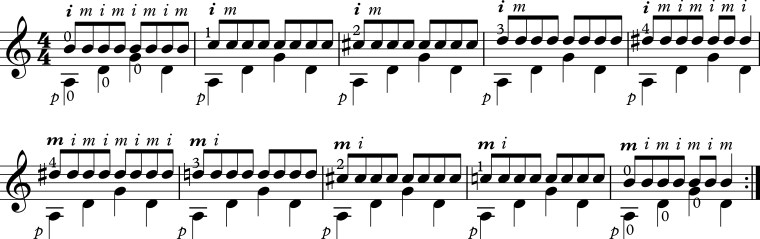
I was warming up this morning and thought I’d post one of my favorite ways to work on scales to both warm up and build speed. I like this sequence because you can set the metronome conservatively and build up as you play. It’s much like the the sequence in this post but applied to scales. I’ll go through this with im (mi) and am (ma) both rest and free stroke but sometimes find myself working on other patterns like pi, ami, ai, and whatever else I feel is going to help my fingers get into the zone. Depending on what’s on my agenda, I may do this for 20-30 minutes or a lot longer pushing myself to build comfort at higher tempos. I like knowing I have a bit more than necessary.
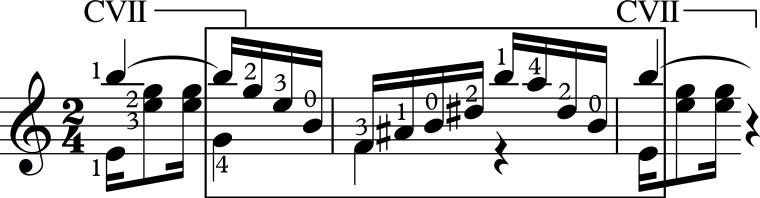
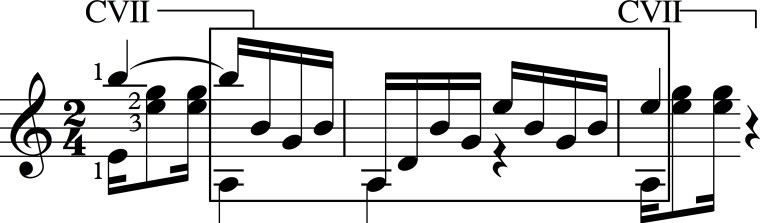
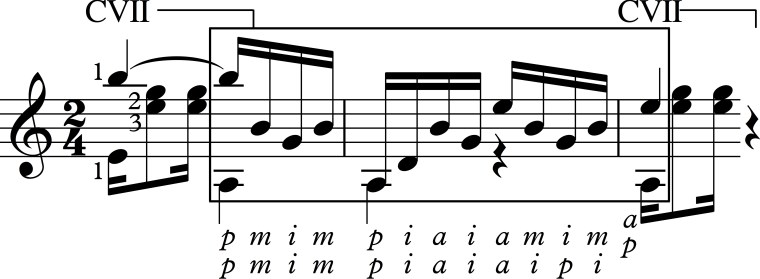
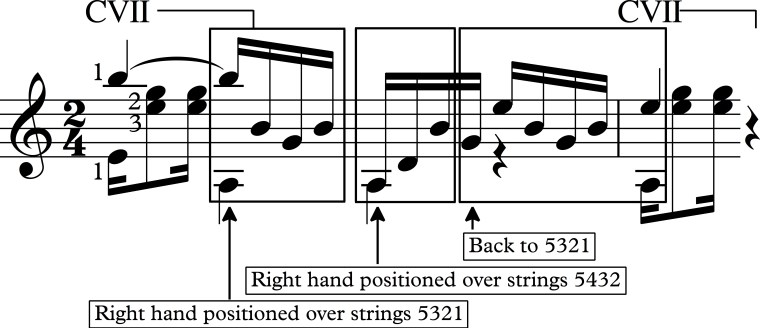
I was working on Joao Pernambuco’s groovy Interrogando with an extremely young and bright student yesterday. Despite his ability to absorb new material at a pace that inspires me, he was having a difficult time making this little part sound fluid.
After a bit of analysis, we agreed that it was due to the lack of clarity in the right hand. So, instead of playing it over and over, which is often default behavior for most students confronting a tricky passage, we decided to break it down and come up with a list of steps to once and for all solve the problem. Here are the steps.
Step 1 – Write out strings.
Writing out the strings as numbers also helps see patterns if you process information better that way (i.e. 5232 5423 1232 ).
We came up with two solutions. The top one was chosen by the student because his technique was more suited to it. I preferred the second solution given to my preference for aipi instead of amim.
Step 3 – Analyze where the right hand position change happens (if at all).
Step 4 – Practice the last box from Step 3 using right hand alone with a focus on rhythm.
Step 5 – Bring left hand into the game for that box only (right hand now does it correctly and proficiently and left hand has to catch up is a much better option than both hands struggling and doing it somewhat incorrectly).
Step 6 – Check in with the right hand alone again.
Step 7 – Go back to Step 4 and Step 6 with the second to last box. Add to last box.
Step 8 – Go back to Step 4 and Step 6 with the first box. Add to both boxes.
Step 9 – Do a few minutes of focus, take a mental rest, and go back for several more sets (building mental muscle!).
Step 10 – Check tempo and set tempo goals.
Not only could the student whip through the passage after doing this, his skills at identifying any confusion improved. Lots of “Oh!” and “Now that feels easy!”.
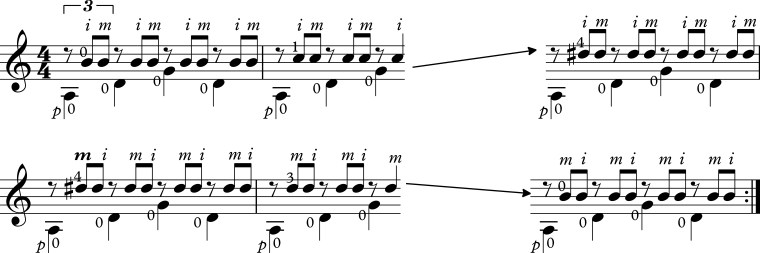
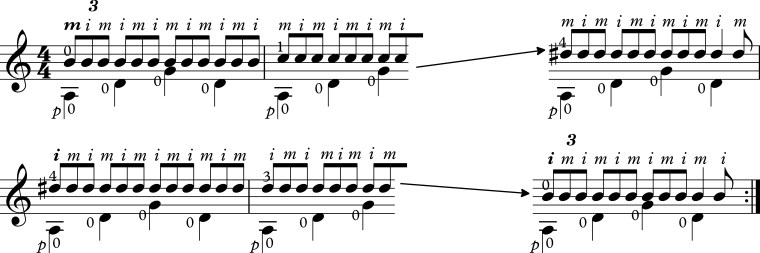
Here is a warm up sequence that I used to do every morning. It is useful for building right hand endurance, finger alternation, speed, pulse, rhythm, and legato. The idea behind it is simple. Set the metronome to a very slow beat, somewhere (50-70). Throughout the whole sequence, the beat remains constant but with very slight and precise increments we increase the number of notes between the beats.
I would go through all 13 steps (using free stroke) and then go through the whole thing two more times using different right hand fingerings am and ai. So, that’s 39 steps. I actually would go all the way up to fret 12 (3 cycles) and often would use a diminished 7th chord or some left hand variation to keep it interesting. Vary what you need. As you will notice, I’ve been more detailed in the first 3 steps and little by little have resorted to short hand as the basic sequence becomes evident.
Give it a whirl and let me know what you think.
Step 1
Step 2
Step 3
Step 4
Step 5
Step 6
Step 7
Step 8
Step 9
Step 10
Step 11
Step 12
Step 13
Phew! Go back for more. You know it’s good for you.
Any guitar related New Year’s resolutions? If one of them was to improve your tremolo technique, then this post is for you.
As we all know, tremolo is tricky. As I mentioned a while ago in the Tremolo, Part 1 post, the elements in place necessary for tremolo to achieve musical expressivity, and come across as fluid and natural, are rhythm precision, consistent intensity from note to note, uniform tone, and speed. Here are several tried and true ways of working on tremolo that always make my fingers feel more confident with tremolo.
Training for Finger Return and Speed
We can work on speed indirectly by changing the right hand pattern. This demands the return of each finger to prepare for its next stroke. Choose a large section of a tremolo piece you are working on and play it with the following fingerings:
To develop the return of i practice pimi and piai.
To develop the return of m practicepmim and pmam.
To develop the return of a practice pama and paia. I would argue that pama is the most beneficial as a usually has a developmental deficiency.
After a masterclass at Antonio Lauro Festival in Venezuela 20+ years ago, phenomenal guitarist David Russell was fielding questions about technique. I think someone asked him how he did tremolo if he broke a nail. With his usual enthusiastic demeanor, he sat down and demonstrated, “If I break a, I play tremolo like this [pimi]. If I break m, I play tremolo like this [piai]. And, if I break i, I’m screwed!”
Training for Improved Rhythm
Another technique to improve pulse, rhythmic consistency, and control from note to note is a bit more difficult to master but well worth exploring. Set your metronome to a slow tempo at first and then practice a section of a piece or the tremolo pattern (pami) on open strings by setting the click to coincide with a.
Then apply the same technique by setting the click to coincide with m.
And, finally, apply the same technique by setting the click to coincide with i.
Here is a masterclass where David Russell demonstrates the technique with his foot instead of the metronome (15:41), and, incidentally, talks about a whole variety of relevant guitar issues – practicing technique, memorizing effectively, etc… You’re in luck if you speak Spanish.
Training for Improved Finger Placement
And, once you’ve practiced the techniques above, try playing expanded bits repeatedly focusing on planting the finger next in line after playing what’s in the brackets.
Play what is in the brackets. Plant a. Rest. Repeat 3x or more.
Proceed to the next group.
Continue with emphasis on the next finger for planting.
Play what is in the brackets. Plant m. Rest. Repeat 3x or more.
I’m working on A Technical Workout for Classical Guitar, Speed and Flexibility, and I thought I would share a portion relating to extensor development in the left hand. I will try to post a video to support this but here is something to keep everyone busy.
Excerpt from up and coming book:
Speed in the left hand is determined by several factors but two of the most important ones are the time it takes the finger to achieve precise placement on the fret and the time it takes the finger to release and reload for the next placement. The former movement depends on the flexor muscles of the fingers which are constantly worked in an active fashion (we typically focus our attention on placement) and the latter movement depends on the extensor muscles of the finger (we typically do not focus on this aspect of the movement). In a way, descending slurs work the extensors but we can be a bit more specific and pro-active about developing extensors in our left hand.
In order to develop the extensor muscles, simply place the finger and then actively release the finger back as quickly as possible achieving a slightly sloppy staccato effect with the left hand. This work does not involve the right hand at all. This movement is more strenuous than it sounds. When done correctly it almost sounds like light slurring. Keep the left hand finger placement accurate and keep the left hand contained so that it’s not the hand that is moving away from the fretboard but the fingers.
Complete Exercise 1 below with all the following left hand finger combinations:
I just came across some newly posted videos of Spanish guitarist extraordinaire, Ricardo Gallén, performing Leo Brouwer’s Sonata Nº4 Sonata del Pensador. The piece is dedicated to Ricardo and whether or not this is the premier or not, it is a fabulous performance.
Then, as often happens, I find myself watching more videos than I really have time for. There is too much to learn. In the next video, Ricardo gives a masterclass with demonstrations and a tremendous amount of insight. Some of the topics he discusses relate to using percussive practice in the left hand when playing fast, drawing on the metaphor of the difference between walking and running. When we walk, our feet plant fully as we balance to lift and take the next step. When we run, we are pounding lightly a bit more percussively. Translated back to guitar, if the left hand holds down and luxuriates on the fret, energy is lost and tempo slows. Ricardo plays an excerpt of Villa-Lobos Etude Nº2 to demonstrate (around minute 17). The key point is that because the left hand is acting more percussively when playing fast, part of the sound comes from the left hand, so that the right hand can relax, aiding in speed.
Another point he makes (around minute 19) is the unbalanced nature of playing guitar. Instinctually our hands want to act together (thought on this in a recent post about neural coupling), squeeze together, let go together. When playing softly or piano in the left hand but the right hand plays loudly or forte we must practice compensating for the discrepancy in energy between both hands. These are brilliant points to ponder. Undoubtably, there are more insights but I’m dying to go practice…
Thought I’d let you all know that I’ve published the first of a series of technique workouts for classical guitarists. This first book, A Technical Workout for Classical Guitar, Level 1 – Base Building, is all about developing a strong foundation with a focus on the most common movements necessary for technique development in both hands. It is suitable for all levels – beginners trying to develop their own routine or advanced players looking for a systematic way to approach technique development. I wish I had had this when I was a young guitarist! It is available on kindle for now with more options soon. Stay tuned for videos going through some of the movements, supplemental publications, and more advanced workouts!
I was recently re-reading a great book about fitness and came across an interesting study that was quoted about neural coupling. The basic idea is that we have neural connections between our upper limbs and lower limbs that coordinate muscle activation patterns during activities like running and walking. For running, this translates to possibly using a strong arm swing to help fatigued leg muscles get through a rough patch or while running up hills. Or, for those with spinal cord injuries, the act of using upper limb movement to aid in recruiting lower limb muscles during rehabilitation could help speed up recovery. Sports science is fascinating. So why am I writing about this here? Well, I was out on a long run this morning, pumping my arms while running up a hill, and playing through music in my head when I thought, “Perhaps what helps runners might not help guitarists!”
One common mistake that I am always working on with students, even advanced ones, is the avoidance of accents after a dramatic shift (unless the music asks for it). A dramatic shift usually is unnecessary but requires a lot of energy to stop the shift which leads to a strong grip in the left hand and inevitably the right hand slams the note with vigor (and unfortunate musical consequences). A variation on this theme is when a guitarist will “grab” a chord instead of placing each finger down sequentially during an arpeggiated chord and will then inevitably accent the first note of the arpeggio. Or, for any of you working with children or young students, ever notice that when asked to play softly, the left hand loses clarity and tempo dips? Maybe, or maybe not, this is due to neural coupling. One hand squeezes strongly and the other follow suit.
Why is this a bad thing for a guitarist, or pianist, or an ambidextrous instrumentalist? Because it simply throws our physical relationship to the instrument out of balance. Most great players cultivate a deep sense of relaxation in both hands that is independent of what the other hand is doing. In the pianist, the left hand may be playing accompaniment softly while the right hand is playing a melodic line that must stand out. In a guitarist, the right hand may have to accent or play certain notes louder to bring out a melody or a subject in a fugue while the left hand needs to remain soft as other fingers squiggle around to play counterpoint.
How can we work on this? Work to develop a better sense of independence in both hands?
Here are a few places to start:
Try to play through a piece or a scale very softly with no fluctuation in volume while focusing on the energy required by the left hand to not buzz and remain clear.
Or the flip side of this, play with a more vigorous touch in the right hand while putting the minimum amount of pressure in the left, erring on slightly buzzy to discover how much pressure is required. Any more than necessary reduces our ability to play for long amounts of time by tiring out the left hand.
Practice shifts while keeping the right hand from accenting notes after the shift. Or, simply try to develop better shifting technique that is based on guide fingers instead of jumping.