Studio Content
This content is restricted to Six String Journal Studio Members only. Join for access.
Tag: left hand exercise
The Best Guided Warm-Up for Your Left Hand, Part 3
I’m in the process of creating a new series of guided warm-ups for my students. Here is Part 3 for Six String Journal readers. In these guided warm-ups, I’ll go through some of the most important drills to help you establish a good routine for warming up before practicing your repertoire.
So go grab your guitar and get comfortable. In this second video, I’ve set the metronome for quarter = 60. We’ll go through the second part of my go-to slur routine, which involves compound slurs (121, 232, 343, 131, 242, 141). For the right hand, I simply use p for strings 6, 5, and 4, and then use i, m, and a for strings 3, 2, and 1. Follow along, stay aware of good form, stay relaxed, and stick with it until you can start to increase tempo with a good foundation.
If you’re a beginner, take it slowly and don’t wear your hand out. Pause occasionally for rest and let your hand catch up. It might help to just watch the first few minutes to get a sense of how it unfolds for the fingers.
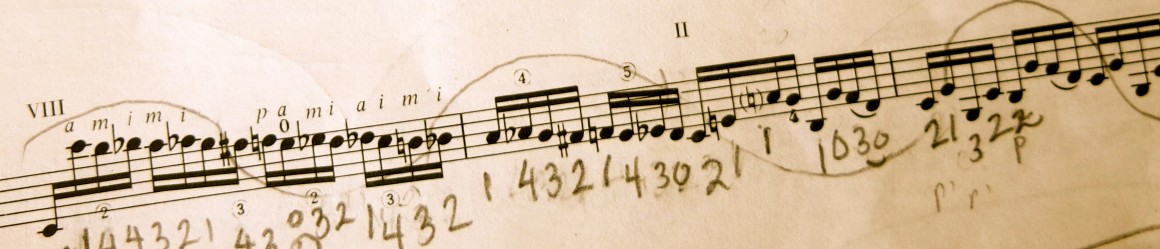
The Best Guided Warm-Up for Your Left Hand, Part 2
I’m in the process of creating a new series of guided warm-ups for my students. Here is Part 2 for Six String Journal readers. In these guided warm-ups, I’ll go through some of the most important drills to help you establish a good routine for warming up before practicing your repertoire.
So go grab your guitar and get comfortable. In this second video, I’ve set the metronome for quarter = 60. We’ll go through the first part of my go-to slur routine. For the right hand, I simply use p for strings 6, 5, and 4, and then use i, m, and a for strings 3, 2, and 1. Follow along, stay aware of good form, stay relaxed, and stick with it until you can start to increase tempo with a good foundation.
If you’re a beginner, take it slowly and don’t wear your hand out. Pause occasionally for rest and let your hand catch up. It might help to just watch the first few minutes to get a sense of how it unfolds for the fingers.
Warm Up With Me!
I’m in the process of creating a new series of guided warm ups for my students. Here is part 1 for Six String Journal readers. In these guided warm ups, I’ll go through some of the most important drills to help you establish a good routine for warming up before practicing your repertoire.
So go grab your guitar and get comfortable. In this first video I’ve set the metronome for quarter = 60. We’ll string cross with single and pairs of fingers and go through a great slur routine with all the pairs of left hand fingers. For the right hand, I simply use p for strings 6, 5, and 4, and then use i, m, and a for strings 3, 2, and 1. Follow along, stay aware of good form, stay relaxed, and stick with it until you can start to increase tempo with a good foundation.
Six String Journal’s Complete Technique Course on Sale
Have some time to work on your technique over the holidays? Through December, my course Complete Technique for Classical Guitar will be on sale through Six String Journal’s Podia page. Use this COUPONCODE for a 20% discount.
Six String Journal’s Complete Technique for Classical Guitar Course was developed for the advancing beginner with some experience, the advancing intermediate guitarist, and will even benefit those with lots of playing experience. Though music theory isn’t necessary, a rudimentary understanding of rhythm is helpful.
The course consists of primary movement videos where I will teach the foundational movements that you’ll need in order to master classical guitar. These videos cover topics such as free-stroke, rest-stroke, arpeggios, alternation, scales, hand coordination, slurs, and shifts. These are followed by several series of secondary videos where I’ll apply the techniques and movements in various ways to help you engrain them into your own practice. Stringing the secondary videos into a sequence will teach you how to form an effective practice routine that will maximize your results and get you closer to your musical goals.
Course Includes
- Hours of focused technique lessons with an award-winning classical guitarist, the founder of Six String Journal, and sought-after educator.
- Over 50 extensively detailed but digestible videos demonstrating essential foundational movements, technique tips, exercises, routines, and how to implement them into your practice, carefully edited in small bite size videos for easy assimilation and viewing.
- Printable PDF summarizing the entire course with a condensed visual of the material presented.
- Loads of bonus content from Six String Journal’s Mastering Diatonic Scales.
Technique Focus – Boost Left Hand Efficiency
When working out the choreography to a new interpretation there are a few aspects of left hand technique that can dramatically improve efficiency. One of those aspects involves a similar idea often referred to as ‘planting’ for the right hand. For example, when playing a rapid and repeated pim arpeggio (like in Asturias), it is common practice to place all three fingers down in a group to stabilize the right hand and to create one efficient gesture instead of three separate actions. The basic rule is that as we move away from p and towards a across string we plant fingers down so the right hand fingers are prepared. Essentially, we stabilize the right hand as we move away from the grounding of p and i.

Applying this concept to the left hand is equally important but the ‘planting’ occurs as we move from finger 4 (pinky) towards finger 1. Theoretically, if only finger 4 is down on the fingerboard, the left hand is not as stable as it would be if another supporting finger were to place somewhere nearby. For example, if we had to play a descending group of chromatic notes 4321 on a string, placing all four fingers before playing reduces the motion to a relaxed gesture of releasing fingers away. If we were to place 4321 down in a sequential fashion, it is not necessarily ‘wrong’, but it would augment the motion of the left hand into many placements and releases, rendering it less efficient. A bit of a mess.
Subscribe to get access
Read more of this content when you subscribe today.
Some related posts:
Advanced Left Hand Training, Part 1
Need something new to add to your slur studies? Try this series of advanced exercises for the left hand that combine compound slurs and accents. Use them to build endurance, control, and precision. For each of the three levels illustrated keep the following points in mind:
- Practice on various strings in various positions.
- Practice slowly with great rhythmic intent.
- Keep movements efficient and clean.
- Play accents clearly.
- Keep left hand wrist and fingers as relaxed as possible.
- If at any point your hand and fingers feel like they are going to fall off, consider stopping.
Level 1
For these exercises use the following left hand finger patterns: 12, 23, 34, 13, 24, 14. The example below uses 12.
Exercise 1

Exercise 2

Exercise 3

Level 2
For these exercises use the following left hand finger patterns: 123, 321, 134, 431, 124, 421, 234, 432. The example below uses 124.
Exercise 1

Exercise 2

Exercise 3

Exercise 4

Level 3
For these exercises use the following left hand finger patterns: 1234, 4321, 1324, 4231, 1423, 4132. The example below uses 1234.
Exercise 1

Exercise 2

Exercise 3

If your left hand has not been challenged or you’d like to expand the exercises a bit or you DO want your hand and fingers to fall off, use a bar or fix a left hand finger that is not in use to another string and nearby fret.
L
Precise Left Hand Finger Placement
The ability to place the left hand in a position to give equal opportunity for each and every finger to fret precisely is essential for playing well. Pinching a fret precisely means pinching a fret while avoiding contact with any adjacent string/s.
There are many instances where the ringing of adjacent strings is necessary. Think of your Bach fugues!
So here are two exercises I like to show students who are struggling with placing left hand fingers precisely. Some things to keep in mind:
- Listen! Keep your ear on the open string to make sure it rings continuously while you play the chromatic notes around it.
- Play really slowly to insure absolute legato.
- Keep right hand fingerings simple. Try using p and i or m for the open string.
- Pay attention to your wrist placement. It should remain relatively flat. Do not push your wrist out in front of the guitar. To create a tunnel for the open string take the bend across the joints in the finger. Think of creating a semi-circle with the finger.
Exercise 1

Exercise 2

Hope this helps clean up those sloppy pinches! : )
Francisco Tárrega’s Technical Studies
 My usual morning consists of a good warm-up (a combination of left hand movements and slurs, right hand alternation movements and arpeggios, and scales), before moving on to practicing spots in pieces, and finally playing through pieces and working on new pieces. However, there are periods of the year where I have more time to extend my technique practice and to learn new pieces. I’m approaching that period now (yeah!) so I’m experimenting with new finger gymnastics to address weaknesses in my technique and building a hearty list of new repertoire to absorb over the summer.
To this end, I was rummaging through my boxes and shelves of music and found a well-worn copy of Francisco Tárrega’s Complete Technical Studies. I pulled it out and went through it again for fun. If you’re looking to shake up your routine, I highly recommend some of his studies.
Below are two of Tárrega’s left-hand exercises that will surely make your left hand sweat. Tárrega notates using im alternation for the right hand but I prefer to simply assign i, m, and a, to strings 3, 2, and 1, and have p play all the bass strings to preserve my nails.
Exercise 1

Exercise 2

Try going from 1st position all the way to 9th and back. Also, try the same concept with other sets of left hand pairs: 14 and 23 or 13 and 24.
Hope that gets your left hand going!
Pavel’s Left Hand Technique Fun
I think I’ve now scoured most of Pavel Steidl‘s masterclasses on youtube. What a treasure trove of advice. I absolutely love him, his creativity, and his masterful ability to teach in such a fun way.
Here is a left hand technique progression that roughly matches what he demonstrates in one of his masterclasses. Pavel recommends at least 30 minutes a day of work for the fingers. Among his bits of advice and reflections, there is a moment in a masterclass where he talks about left hand choreography and how it is connected to the part of our brain that is responsible for, as he puts it, “fantasy and imagination.”
Here is the sequence to explore:
Step 1
Play the top voice as a continuous slur.

Move on to the next step or repeat with the remaining patterns:
02/1343, 03/1242, 04/1232 (slur/counterpoint)
Step 2
Now slur the counterpoint or fixed note as well.

Move on to the next step or repeat with the remaining patterns (see above).
Step 3
Add in a coordinating movement in the right hand (try something simple first).

Move on to the next step or repeat with the remaining patterns (see above).
Step 4
Explore a more challenging coordinating movement in the right hand (try pami on string 5).

Be creative and have fun just like Pavel!