Left Hand Warmup: Slurs, Fixed Fingers, Open Strings, and Tunnels

Lately, when starting my practice I will start with an assortment of left hand movements. I go slowly with attention to the fluidity of the movements. While I do this, my ear starts to focus. The easy pace is ideal for adjusting tone and exploring left hand movement before moving on to arpeggios, scale fragments, and spots in pieces.

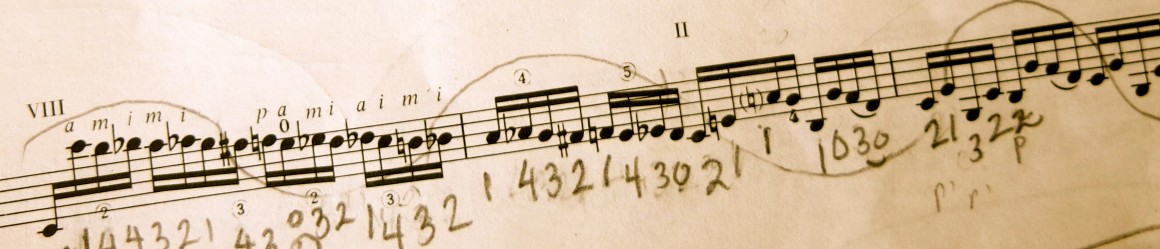
Here is a slur sequence I really enjoyed focusing on yesterday. It involves playing slurs with a pair of fingers, slurs to and from open strings, all while requiring the precise placement of the fingers to create tunnels so that adjacent strings remain unobstructed. Fun!

I immediately thought: BLOG POST!

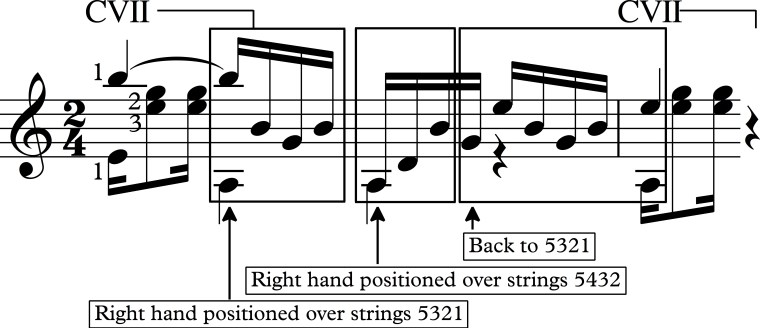
Here’s the outline of the movement using fingers 12 but you should try all pairs (23, 34, 13, 24, 14). You’ll get more out of the exercises by repeated each slur many times and of course, play them across all strings and positions.

Method of Practice

Fixed Finger Slur Exercise 2.jpg

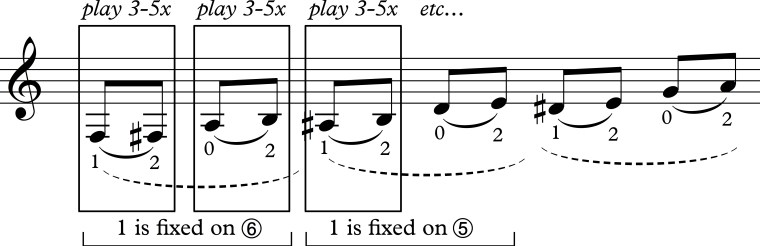
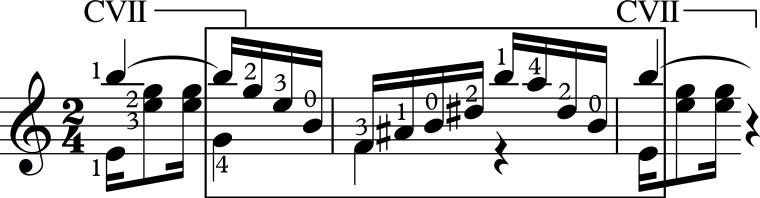
Exercise 1 – Ascending Slurs

Fixed Finger Slur Exercise.jpg

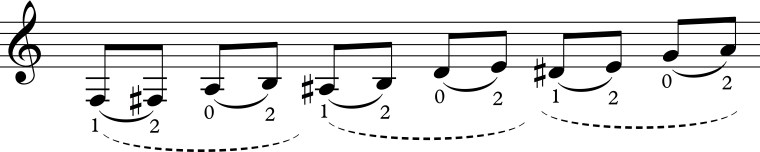
Exercise 2 – Ascending Slurs 2

Fixed Finger Slur Exercise 3.jpg

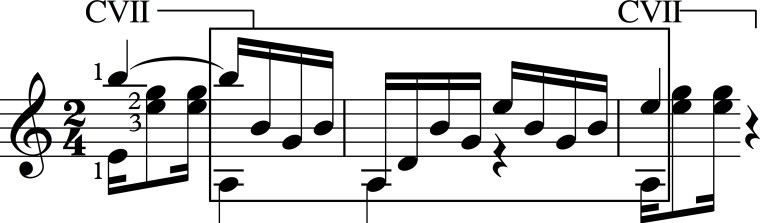
Exercise 3 – Ascending and Descending Slurs

Fixed Finger Slur Exercise 2a.jpg

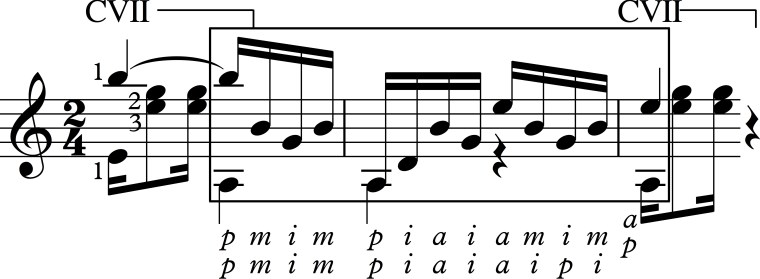
Exercise 4 – Descending Slurs

Fixed Finger Slur Exercise 4.jpg

Exercise 5 – Descending and Ascending Slurs

Fixed Finger Slur Exercise 5.jpg

Go give that left hand a workout!


Slow Practice

I often try to convince students to practice ultra slowly by using various metaphors. How much more would you notice if you were to admire a great piece of art for an hour instead of a minute? How would your thoughts change if you read a complex paragraph quickly versus reading it slowly and contemplating the meaning of each word and sentence as it related to the whole? If metaphors don’t convince them they can go read this fabulous article for pianists written by pianist Graham Fitch about the slow practice that I think is spot on!

Enjoying Ultra Slow Practice

Hope you enjoy it as much as I did.


Right Hand String Crossing Technique Tip

One aspect of Ángel Romero‘s edition of Joaquín Rodrigo’s Concierto de Aranjuez is that every single scale is fingered optimally for string crossing so that almost always reaches towards a higher string when blazing through the scale passages (i.e. when going from string 2 to 1, it is fingered i m and not m i). And while you could employ slurs or shifts to maintain optimum string-crossing, if those solutions are not musically in the cards there is a finger standing on the sidelines waiting eagerly to help: a. Using a to switch from im alternation to mi alternation without skipping a beat is an important skill to develop for situations where you would want to maintain optimum string-crossing for the right hand. Here are a few exercises using a to develop this technique.

Keep the following points in mind when going through these.

  1. Maintain a steady metric pulse.
  2. Keep your tone consistent.
  3. Practice rest-stroke and free-stroke.

Exercise 1

Using a to switch direction.jpg

Exercise 2 and 3

Using a to switch direction 2.jpg

Exercise 4 and 5

Using a to switch direction 3.jpg

Go a!

Rafael Elizondo’s Technique Videos

Rafael Elizondo is a fabulous Mexican concert guitarist who has been making wonderful videos for his youtube channel. If you don’t speak Spanish, you may not be at too much of a disadvantage because he demonstrates everything very clearly. This instructional video below is a fine example of Rafael explaining how to use fixed fingers to establish stability and confidence in the right hand.

Here is another great one where he demonstrates 4 finger coordination patterns for the left hand:

Check out and subscribe to his channel. There are tons of great posts.

More soon…


Technical Workout for Classical Guitar, Level 1 – Base Building, Part 3 (video)

Here is the third of Six String Journal’s series of technique videos to accompany my recent workbook, A Technical Workout for Classical Guitar, Level 1 – Base Building. This video corresponds to Left Hand Movements, Part 3.

This workbook is designed to help late beginners and intermediate guitarists develop a daily routine of movements to strengthen their technical base so that fingers can do their job properly when assimilating new repertoire. Always go slowly with the most control possible. Think of it as writing a program for your brain with no bugs.

Technical Workout for Classical Guitar, Level 1 – Base Building, Part 2 (video)

Here is the second of Six String Journal’s series of technique videos to accompany my recent workbook, A Technical Workout for Classical Guitar, Level 1 – Base Building. This video corresponds to Left Hand Movements, Part 2.

This workbook is designed to help late beginners and intermediate guitarists develop a daily routine of movements to strengthen their technical base so that fingers can do their job properly when assimilating new repertoire. Always go slowly with the most control possible. Think of it as writing a program for your brain with no bugs.

Technical Workout for Classical Guitar – Level 1 – Base Building, Part 1 (video)

Here is the first of Six String Journal’s series of technique videos to accompany my recent workbook, A Technical Workout for Classical Guitar, Level 1 – Base Building. This video corresponds to Left Hand Movements, Part 1.

This workbook is designed to help late beginners and intermediate guitarists develop a daily routine of movements to strengthen their technical base so that fingers can do their job properly when assimilating new repertoire (that was wordy!). Always go slowly with the most control possible. Think of it as writing a program for your brain with no bugs.


Developing Coordination and Stroke Control

Whatever your musical intentions, developing evenness from finger stroke to finger stroke across various pulse patterns is an essential component to good right hand technique. One tool to develop this through scales is to pair three-finger right hand patterns (ami, pmi, ima) to duple rhythms, such as eighth and sixteenth notes, or two-finger patterns (im, am, ai, pi, pm, pa) to triplet patterns. Sort of like patting your head and rubbing your belly at the same time.

I’ll use the following Major scale form to illustrate.

Scale Warmup 1.jpg

Three Against Two

Step 1 – Play the following eighth notes using the following three-finger right hand fingerings: ami, pmi, ima. Focus on maintaining a clear duple pulse and a consistent tone quality from note to note.

Scale Warmup 2.jpg

Step 2 – Play the following sixteenth notes using the following right hand fingerings: ami, pmi, ima. Focus on maintaining a clear duple pulse and a consistent tone from note to note.

Scale Warmup 8.jpg

Step 3 – Once that is comfortable, you can further develop coordination between your hands by playing patterns that emphasize a duple feel continuing to use the right hand fingerings: ami, pmi, ima. Here are some of my favorites.

Pattern 1

Scale Warm Up 2a.jpg

Pattern 2Scale Warmup 2c.jpg

Pattern 3

Scale Warmup 2b.jpg

Pattern 4

Scale Warmup 8a.jpg

Pattern 5

Scale Warmup 8b.jpg

Two Against Three

Step 4 – Play the following triplets using the following right hand fingerings: im, am, ai, pi, pm, and pa. The most important fingerings to develop are im, am, and pi so prioritize there first. Like before, focus on maintaining a clear triple pulse and a consistent tone from note to note.

Scale Warmup 5.jpg

Step 5 – Time to coordinate those fingers. Challenge yourself to play patterns that emphasize a duple feel continuing to use the right hand fingerings: im, am, ai, pi, pm, and pa.

Pattern 1

Scale Warmup 5a.jpg

Pattern 2

Scale Warmup 5b.jpg

Pattern 3

Scale Warmup 5c.jpg

Good luck and go pluck.

Building Scale Speed

I was warming up this morning and thought I’d post one of my favorite ways to work on scales to both warm up and build speed. I like this sequence because you can set the metronome conservatively and build up as you play. It’s much like the the sequence in this post but applied to scales. I’ll go through this with im (mi) and am (ma) both rest and free stroke but sometimes find myself working on other patterns like pi, ami, ai, and whatever else I feel is going to help my fingers get into the zone. Depending on what’s on my agenda, I may do this for 20-30 minutes or a lot longer pushing myself to build comfort at higher tempos. I like knowing I have a bit more than necessary.

The Technical Workout for Classical Guitar, Level 2 – Speed and Flexibility workbook has a section very similar to this.

Here is the sequence:

Step 1

scale-warmup-1

Step 2

scale-warmup-2

Step 3

Scale Warmup 3.jpg

Step 4

Scale Warmup 4.jpg

Step 5

Scale Warmup 5.jpg

Step 6

Scale Warmup 6.jpg

Step 7

Scale Warmup 7.jpg

Step 8

Scale Warmup 8.jpg

Step 9

Scale Warmup 9.jpg

Step 10

Scale Warmup 10.jpg

Step 11

Scale Warmup 11.jpg

Good luck!

Problem Solving in Pernambuco’s Interrogando

I was working on Joao Pernambuco’s groovy Interrogando with an extremely young and bright student yesterday. Despite his ability to absorb new material at a pace that inspires me, he was having a difficult time making this little part sound fluid.

Interrogando 1.jpg

After a bit of analysis, we agreed that it was due to the lack of clarity in the right hand. So, instead of playing it over and over, which is often default behavior for most students confronting a tricky passage, we decided to break it down and come up with a list of steps to once and for all solve the problem. Here are the steps.

Step 1 – Write out strings.

Interrogando 2.jpg

Writing out the strings as numbers also helps see patterns if you process information better that way (i.e. 5232 5423 1232 ).

Step 2 – Choose the best right hand fingering options. See this post for more about choosing the best options: Conde Claros, Scales, and String-Crossing.

Interrogando 3.jpg

We came up with two solutions. The top one was chosen by the student because his technique was more suited to it. I preferred the second solution given to my preference for aipi instead of amim.

Step 3 – Analyze where the right hand position change happens (if at all).

Interrogando 4.jpg

Step 4 – Practice the last box from Step 3 using right hand alone with a focus on rhythm.

Step 5 – Bring left hand into the game for that box only (right hand now does it correctly and proficiently and left hand has to catch up is a much better option than both hands struggling and doing it somewhat incorrectly).

Step 6 – Check in with the right hand alone again.

Step 7 – Go back to Step 4 and Step 6 with the second to last box. Add to last box.

Step 8 – Go back to Step 4 and Step 6 with the first box. Add to both boxes.

Step 9 – Do a few minutes of focus, take a mental rest, and go back for several more sets (building mental muscle!).

Step 10 – Check tempo and set tempo goals.

Not only could the student whip through the passage after doing this, his skills at identifying any confusion improved. Lots of “Oh!” and “Now that feels easy!”.

Problem solved!