Technique Focus – Boost Left Hand Efficiency

When working out the choreography to a new interpretation there are a few aspects of left hand technique that can dramatically improve efficiency. One of those aspects involves a similar idea often referred to as ‘planting’ for the right hand. For example, when playing a rapid and repeated pim arpeggio (like in Asturias), it is common practice to place all three fingers down in a group to stabilize the right hand and to create one efficient gesture instead of three separate actions. The basic rule is that as we move away from p and towards a across string we plant fingers down so the right hand fingers are prepared. Essentially, we stabilize the right hand as we move away from the grounding of p and i.

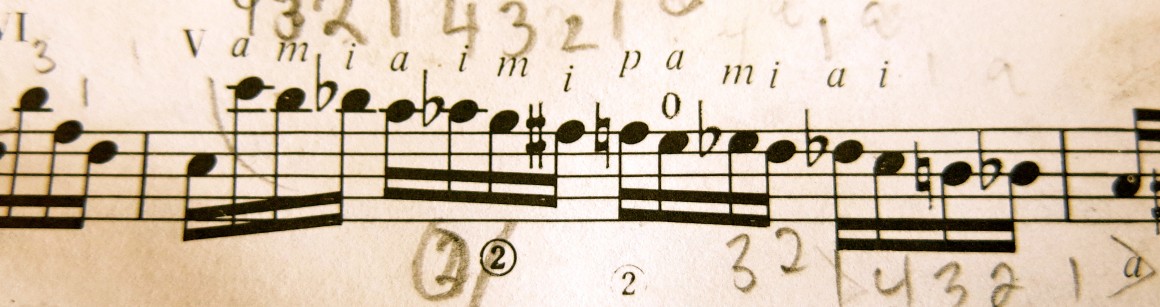
Applying this concept to the left hand is equally important but the ‘planting’ occurs as we move from finger 4 (pinky) towards finger 1. Theoretically, if only finger 4 is down on the fingerboard, the left hand is not as stable as it would be if another supporting finger were to place somewhere nearby. For example, if we had to play a descending group of chromatic notes 4321 on a string, placing all four fingers before playing reduces the motion to a relaxed gesture of releasing fingers away. If we were to place 4321 down in a sequential fashion, it is not necessarily ‘wrong’, but it would augment the motion of the left hand into many placements and releases, rendering it less efficient. A bit of a mess.

Subscribe to get access

Read more of this content when you subscribe today.

Some related posts:

Six String Journal’s Complete Technique Course

NEWS! Complete Technique Video Course Launch!

Studio content
This article continues inside the Six String Journal Studio, where members have access to in-depth repertoire walkthroughs, practice guidance, and performance-focused writing.

Join the Studio

Nine Tips for Better Playing

I love the early stages of learning new repertoire because my ears, eyes, and fingers are most alert to discovery. My process of learning has evolved dramatically from when I first became afflicted with the classical guitar bug. For many beginners, the goal is simply to find a way to get the fingers to the right places and enjoy the results. As beginners approach basic fluency, the process of learning involves more and more layers of thought and reflection, of crafting and re-crafting, of listening and sculpting. As intermediate players reach a more advanced level, the amount of thought about what is going to occur on both a musical and physical level during the very early stages sets the stage for clean, efficient, and musical playing that seems seamless to the less experienced player.

Incorporating the following tips and principles will yield the best and most reliable results if they are incorporated in the early stages of the learning process. Exploring the ideas on repertoire that is already baked into your brain will take some careful and deliberate work to incorporate. Think of it like cooking a complicated dish, if all is measured carefully and timed precisely, the end result is wonderful. On the other hand, if you have forgotten to include ingredients in the baking process and attempt to salvage it by throwing in missing ingredients after the dish is done, the end result may not be as wonderful.

When learning a new piece, there is information absent from the score that if written in reminds you to weave them into your hand choreography when you practice. Below is a list that will help make both the left and right hands more efficient and two shots of a Scarlatti Sonata I just learned to illustrate how I label these items in a score. Assuming your basic fingerings are decided upon, incorporate the following ideas into your slow practice (and label them) to build a strong and reliable visual memory and choreography:

Right Hand

  1. Know when the fingers can plant or are laid out as an arpeggio (even though it may be the beginning of a scale passage).
  2. Know where your stability points are at all times. There should always be a right hand anchor in contact with the strings (usually p or a but possibly a combination).
  3. Insure string crossing is optimized and know when there are exceptions. See this early article for reference.

img_4902-1.jpg

Left Hand

  1. Know when two fingers can place at once (usually in descending melodic fragments).
  2. Know when a finger can remain in place as an anchor and for how long.
  3. Know exactly what and why you are barring. Is it a hinge, partial, tip, cross, full, etc… (maybe there’s content for another post here!)?
  4. Know when a finger must lift from active duty to align or migrate to a new fret or to relieve tension. This sometimes means that theoretically a note may not last it’s full value.
  5. Know when you are shifting and/or expanding or contracting out of a standard relaxed position and for how long.
  6. Know your guide fingers (never shift without a guide or ghost guide finger).

img_4901.jpg

Hope that helps you get to your musical goals sooner!

If you liked this article and would like more technique tips, check out Six String Journal’s publications! Please share, like, and comment!

Advanced Left Hand Training, Part 1

Need something new to add to your slur studies? Try this series of advanced exercises for the left hand that combine compound slurs and accents. Use them to build endurance, control, and precision. For each of the three levels illustrated keep the following points in mind:

  1. Practice on various strings in various positions.
  2. Practice slowly with great rhythmic intent.
  3. Keep movements efficient and clean.
  4. Play accents clearly.
  5. Keep left hand wrist and fingers as relaxed as possible.
  6. If at any point your hand and fingers feel like they are going to fall off, consider stopping.


Level 1

For these exercises use the following left hand finger patterns: 12, 23, 34, 13, 24, 14. The example below uses 12.

Exercise 1

slur12 accent 1 August 2018.jpg

Exercise 2

slur12 accent 2 August 2018.jpg

Exercise 3

slur12 accent 3 August 2018.jpg


Level 2

For these exercises use the following left hand finger patterns: 123, 321, 134, 431, 124, 421, 234, 432. The example below uses 124.

Exercise 1

slur124 accent 1 August 2018.jpg

Exercise 2

slur124 accent 2 August 2018.jpg

Exercise 3

slur124 accent 2a August 2018.jpg

Exercise 4

slur124 accent 3 August 2018.jpg


Level 3

For these exercises use the following left hand finger patterns: 1234, 4321, 1324, 4231, 1423, 4132. The example below uses 1234.

Exercise 1

slur1234 accent 1 August 2018.jpg

Exercise 2

slur1234 accent 2 August 2018.jpg

Exercise 3

slur1234 accent 3 August 2018.jpg

If your left hand has not been challenged or you’d like to expand the exercises a bit or you DO want your hand and fingers to fall off, use a bar or fix a left hand finger that is not in use to another string and nearby fret.

L

Technique Practice on Albéniz’s Sevilla

Studio content
This article continues inside the Six String Journal Studio, where members have access to in-depth repertoire walkthroughs, practice guidance, and performance-focused writing.

Join the Studio

Jacob Cordover Interview

Studio content
This article continues inside the Six String Journal Studio, where members have access to in-depth repertoire walkthroughs, practice guidance, and performance-focused writing.

Join the Studio

Expanding Fernando Sor’s Etudes

images-1.jpgI have to admit that I may be enjoying Fernando Sor’s etudes too much these days. Many of them conjure a nice summer walk in the countryside with the occasional mildly adventurous detour. A set of favorites that I’m editing will be published soon but I thought I’d post a lesson on one of them and how I have been using it to warm up and build technique. His etudes are ideal in many ways to integrate musicality into technique because listening to the subtleties and manipulations of Sor’s familiar but often charming harmonies is so pleasurable.

Once you master his etudes, there are many possibilities for expansion but I’m going to use Etude Op. 35, Nº9 to illustrate how I like to use it to develop right hand technique. Here is a read-through for those of you not familiar with it.

First Step

Try to build flexibility into your right hand by playing the etude as written with the following right hand patterns:

piai, pimi, piâi

Fernando Sor Etudes ex 1.jpg

Variation 1

Once these are reliably developed, you’re ready for some fun. Use the following pattern to help develop the weaker alternation with these patterns:

piaiaiai, piamamam, pimimimi

Fernando Sor Etudes ex 2.jpg

Variation 3

Or, another option could be to explore moving out of a right hand arpeggio position into a more right hand scalar position with:

piaiamim, piaiaimi, piaiamia, piaiamam

Fernando Sor Etudes ex 3.jpg

Variation 4

Or, if you are feeling musically creative, explore adding a note to complement the melody within the key:

Fernando Sor Etudes ex 4.jpg

Variation 5

Change it up a bit to get in your triplets:

Fernando Sor Etudes ex 6.jpg

Or, if you prefer:

pimamiamiami, piamipamiami, etc…

Fernando Sor Etudes ex 5.jpg

There are so many places to go with these little gems. Fun!

Download: Fernando Sor Etude Op. 35, Nº9


One-Time
Monthly
Yearly

Make a one-time donation

Make a monthly donation

Make a yearly donation

Choose an amount

¤5.00
¤15.00
¤100.00
¤5.00
¤15.00
¤100.00
¤5.00
¤15.00
¤100.00

Or enter a custom amount

¤

Your contribution is appreciated.

Your contribution is appreciated.

Your contribution is appreciated.

DonateDonate monthlyDonate yearly

Mauro Giuliani’s Folias, Op. 45

A few months ago I edited a new edition of Mauro Giuliani’s Variations on Las Folias de España, Op. 45 and have just made it available. Since I recently posted an article on the value of practicing chromatic octaves to build left hand coordination, I thought I’d post the 4th variation from Giuliani’s great work for all of you to test your abilities!

Screen Shot 2017-07-10 at 11.54.06 AM.png

Precise Left Hand Finger Placement

The ability to place the left hand in a position to give equal opportunity for each and every finger to fret precisely is essential for playing well. Pinching a fret precisely means pinching a fret while avoiding contact with any adjacent string/s.

There are many instances where the ringing of adjacent strings is necessary.  Think of your Bach fugues!

So here are two exercises I like to show students who are struggling with placing left hand fingers precisely. Some things to keep in mind:

  1. Listen! Keep your ear on the open string to make sure it rings continuously while you play the chromatic notes around it.
  2. Play really slowly to insure absolute legato.
  3. Keep right hand fingerings simple. Try using and or m for the open string.
  4. Pay attention to your wrist placement. It should remain relatively flat. Do not push your wrist out in front of the guitar. To create a tunnel for the open string take the bend across the joints in the finger. Think of creating a semi-circle with the finger.

Exercise 1

Chromatic Linear Scale with open 1.jpg

Exercise 2

Chromatic Linear Scale with open 2.jpg

Hope this helps clean up those sloppy pinches! : )


How to Improve Coordination – Chromatic Octaves

Studio content
This article continues inside the Six String Journal Studio, where members have access to in-depth repertoire walkthroughs, practice guidance, and performance-focused writing.

Join the Studio