What arpeggio patterns would you practice if you had a limited amount of time? This is a question I receive from students often. Depending on your level, experience, time, repertoire, there are many answers. To keep it on the simpler side, I propose the following: pim , pmi, pima, pami, pimi, pmim, and finally pimami.
In the following three videos, I talk about how I like to practice these arpeggios. I go over how to warm up, when to use various planting techniques, what I think about as a I play them, what to listen for, how to expand some of them, and how to involve the left hand, hoping to clarify many questions that pop up in lessons.
Get your guitars out to try out some of the ideas as I demonstrate them and let me know if they help.
In this video I talk about practicing the six basic four string arpeggios with four right hand fingers and the importance of planting for beginners. Planting will stabilize the right hand and will help deepen your hand’s relationship to the span of the strings.
Don’t forget to subscribe to the youtube channel. I’m putting more stuff that is not linked right away to Six String Journal. Leave a comment if you have questions!
I wrote this for the Tonebase blog a while ago and thought I’d share it here. Hope it helps!
A crucial aspect of right-hand technique is the ability to control the stroke of each finger when it interacts with the string. During this interaction, the energy of the stroke determines the volume of the note and, if well done, does not displace the other right-hand fingers in the process. This requires right-hand finger independence. To this end, I like to walk students through a series of activities utilizing a fixed right-hand finger with the focus of keeping the hand and inactive finger calm.
During the sequence and patterns, watch the right hand as carefully as possible for any extraneous or micro movements. Ask yourself whether it is possible to pare these movements down to stillness. Does the thumb stroke overwhelm the hand? Are there any fingers or combinations that are more uncomfortable or weak? Is the stroke efficient?
To start, place all right-hand fingers (p, i, m ,a) on the 4th, 3rd, 2nd, and 1st strings respectively. I recommend using a metronome (quarter note = 60).
Step 1
While keeping the inactive finger on its respective string, starting softly, play the following patterns. Go slowly and spend enough time on each pattern (a minute or two) before moving to the next one. Focus on keeping the same volume in both the thumb and the fingers that are alternating or working together. Note:a should remain fixed on string 1
Repeat Step 1 but impose the metrical accent. Think: 1 and 2 and 1 and 2 and, etc. Weak beats (the ands) should be slightly softer. For fun, drop the strong beats to the background and play the weaker beats with more energy. Watch your hand with curiosity to see how it behaves. Make deliberate adjustments until it feels groovy, balanced, and comfortable. Experiment with volume. Experiment with tempo.
Step 2
While keeping the inactive finger on its respective string, starting softly, play the following patterns. Take your time to feel. Focus on keeping the same volume in both the thumb and the fingers that are alternating or working together. Note:m should remain fixed on string 2
Repeat Step 2 but impose the metrical accent. Keep weak beats softer. Watch your hand with curiosity to see how it behaves. Make adjustments until it feels right. Experiment with volume and tempo.
Step 3
You know the drill. Take your time to feel. Focus on keeping the same volume in both the thumb and the fingers that are alternating or working together. Note:i should remain fixed on string 3.
Repeat Step 3 but impose the metrical accent. Keep weak beats softer. Watch your hand with curiosity to see how it behaves. Make adjustments until it feels right. Experiment with volume and tempo.
It is nice to follow these three steps with some arpeggio etudes.
If you’ve been working on right hand arpeggios or etudes and find that alternation between m and a is not as comfortable as i and m (or i and a) then you’ve come to the right place. The exercises below will help remedy this problem. Simply because of our hand anatomy, independence between m and a is more difficult to develop, so I often suggest adding a bit of extra mama to the basic patterns most students use to develop their right hand position and their arpeggios. Adding a little bit extra mama consistently will pay off over the course of weeks, so keep at it.
Here are the six patterns I encourage students to practice regularly:
Here is pima with extra mama (I like to add some activity in the left hand but it is not necessary):
pima + mama
Continue through the other patterns in a similar way. As always, use a metronome, strive for a consistent sound, and relax your right hand.
The Best Right-Hand Exercise You are Not Doing by Leo Garcia
If you've worked through both Part 1 and Part 2 to improve your right-hand confidence, you can add this exercise to the bunch. I teach this one to students who are working on developing tremolo. But it's very useful for mastering . . .
Studio Content This content is restricted to Six String Journal Studio Members only. Join for access.
Improve Your Right Hand Confidence, Part 2 by Leo Garcia
The most important movements to confident right hand technique include alternation between pairs and groups of fingers and how these fingers move across strings. Now we'll take the idea a bit further than we did in Part 1. Remember to use these exercises consistently as part of your daily warm-up. Try the next several exercises using various speeds and the most common right hand fingerings: . . .
Studio Content This content is restricted to Six String Journal Studio Members only. Join for access.
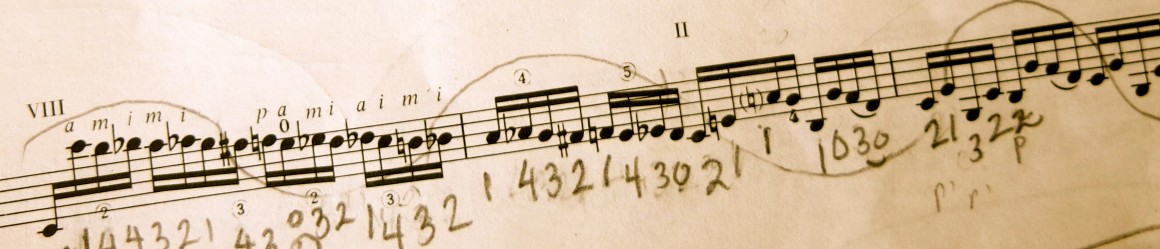
Heitor Villa-Lobos’s Twelve Etudes form part of the foundational pillars of modern guitar technique. Etude Nº1 in E Minor begins the cycle by setting an impressionistic harmonic stage for the evolution of the remaining eleven.
This particular etude has right-hand fingerings suggested by Segovia which over the years I’ve used but I like experimenting and have recently found that I like a different pattern. Each pattern yields a slightly different feel. Here I am using p m p i p m p i p m p i p i p i but also warm up using many others. I love working on this etude and come back to it often when I have lots of time to practice. Try these patterns to see if any work or to simply improve your command of the instrument.
p i p i
p m p m
p a p a
p m p i p m p i p m p i p i p i – I use this one in the video above.
p m p i p m i a i a i m p i p i – I find this one to help with the transition into each measure. Honestly, I think it is the best one for me but I need to be warmed up for it to feel great.
p m i a p m i a p i p i p i p i – I think this one is nuts but I saw someone do it really well.
p m p m p m p m p i p i p i p i – This one retains the natural right hand finger position in relation to the thumb.
Any others that you all use?
I’ll try to get a video post of chaining to show how you can practice at tempo. It’s a valuable practice technique for a piece like this.
To conclude our video series covering right-hand technique development in Heitor Villa-Lobos’ Etude N°1, I’ll explore how to use the concept of bursts (another rhythmic manipulation) to develop speed and further strengthen right-hand rhythmic precision, right-hand preparation, control, and clarity.
After repeated requests for more videos, I’m eager to share this post and upcoming video series on Heitor Villa-Lobos’ Etude Nº1. In this first part I’ll explore the advantages and disadvantages of the standard fingering that Andrés Segovia wrote in the published edition. I’ll then offer some options for practicing the Etude. In Part 2, I’ll go through some options to overcome the disadvantages and finally arrive at my preferred fingering.